CUSTOMIZE
There are many site-wide options available for you to choose in the Customize area of the StageHand template. In the back-end of WordPress, click on your organization name in the top left corner to visit the homepage of the site. Then click “Customize” to open the left hand panel with these options.
- Site Identity – upload your logo, enter title, enter tagline, and upload site icon
- Options – choose theme style, button style, link style, and gutter style
- Navigation – select styles for main, secondary, and sidebar navigation including size, weight, and color
- Typography – choose font family and weight for headings and paragraphs throughout the website
- Colors
- Choose your theme background (white or gray)
- Select you primary, primary dark, and light background colors to fit your branding
- Alert bar options – select the background and font colors
- Hero – choose your preferences for all hero displays, including hero padding, alignment, subnavigation size, and opacity of color overlay
- Bio – choose square, rounded, or circle shapes for bio images
- Icons – choose colors for sidebar production icons and social media icons
PAGES
Pages are used for the Home, About, Resources, Support, etc. You can add, update and delete pages – which you can read more about below.
Add a Page
- In the back-end of WordPress, hover over Pages in the left-hand column and click on Add New.
- Alternatively, you can click on Pages in the left-hand column, and then click the Add New button at the top of the page.
- Enter a Title and complete the Hero section. Select as many Content Modules (more info below) as necessary and click Publish in the top right.
Edit an Existing Page
- In the back-end of WordPress, click on Pages in the left-hand column, and then click the title of the Page you’d like to update.
- Update the Title and any additional Content.
- Click Preview in the top right to view changes before pushing them live.
- Click Update in the top right.
Delete an Existing Page
- In the back-end of WordPress click on Pages in the left-hand column, and then hover over the title of the Page you’d like to delete.
- Click on the Trash link that appears below the title.
- To undo a delete, click on the Trash link above the list of Pages, find the page you’d like to restore and click the Restore link.
- Alternatively, you can delete a page by viewing the edit page for the specific page, and click Move to Trash in the top right, next to the Update button.
PRODUCTIONS
Productions are pages specifically for shows and performances that are featured in your season. These pages hold specific features that will highlight relevant info for your audiences.
Add a Production
- In the back-end of WordPress, hover over Productions in the left-hand column and click on Add New.
- Alternatively, you can click on Productions in the left-hand column, and then click the Add New button at the top of the page.
- Fields to complete:
- Title
- Production Dates — enter individual performance dates for the production.
- Click the ‘Add Date’ button on the right hand side
- Date and Time — enter individual performance date and times.
- Individual Ticket Links – You can enter a specific ticket link for each performance date if needed that will populate the calendar.
- Ticket Link
- Ticket Link Text – the text that will appear on the ticket button at the top of the page
- Ticket Link URL – the link to the ticketing page
- Hero/Featured Image
- Click “Set Featured Image” in the right hand column— Upload a Hero Image
- Image should be at least 1440×800
- Details – relevant information to you audiences about each production that will appear in the sidebar of the page; add one by one
- Title – information that will be bolded
- Icon – choose from the available icons as a visual cue for the type of info listed here (NOTE: you can change the style of the icons in the Customizer)
- Text – any details or additional information you have associated with this category
- Credits – list any artistic or production team members that you wish; add one-by-one
- Detail – Title/Credit that will appear bolded
- Name – individuals name
- Content Modules — more info on each of the content modules is listed further down on the page. The content modules that we recommend for this page include:
- Bios – for cast members and artistic leadership
- Testimonial – for reviews/quotes
- Video – for trailer/promo
- Gallery – for production photos
- Click Publish in the top right.
Edit an Existing Production
- In the back-end of WordPress, click on Posts in the left hand column, and then click the title of the Post you’d like to update.
- Update the Title and any additional Content and click Update in the top right.
- ADDITIONAL FEATURES of a production page
- Sold Out – This function allows you to indicate if tickets for a show are no longer available – whether sold out, past date, or is a free event. To implement this you can:
- Check the “SOLD OUT” box just under the production’s primary text box.
- Once checked you can use the text box to change the text that will appear on the deactivated button.
- Archive – This allows you to indicate if a show is in a past season and will remove it from listing on the Productions page. Just check the “Archive” box under the Credits sections.
Delete an Existing Production
- In the back-end of WordPress, click on Productions in the left-hand column, and then hover over the title of the Production you’d like to delete.
- Click on the Trash link that appears below the title.
- To undo a delete, click on the Trash link above the list of Productions, find the post you’d like to restore and click the Restore link.
- Alternatively, you can delete a production by viewing the edit page for the specific post, and click Move to Trash in the top right, next to the Update button.
POSTS
Posts are the blog posts or news items you’ll publish on your website.
Add a Post
- In the back-end of WordPress, hover over Posts in the left-hand column and click on Add New.
- Alternatively, you can click on Posts in the left-hand column, and then click the Add New button at the top of the page.
- Enter a Title and content.
- Hero – upload a hero image by clicking on “Featured Image” in the right hand column.
- Categories – this feature can be used to group posts into a series or pull certain group of posts to be featured in the Posts content block
- Content Modules – you have the option add additional content modules to each blog post, but we recommend using these sparingly. For example, an image gallery may be a good additional to a blog post if you are writing about a particular event or workshop.
- Click Publish in the top right.
Edit an Existing Post
- In the back-end of WordPress, click on Posts in the left hand column, and then click the title of the Post you’d like to update.
- Update the Title and any additional Content and click Update in the top right.
Delete an Existing Post
- In the back-end of WordPress, click on Posts in the left-hand column, and then hover over the title of the Post you’d like to delete.
- Click on the Trash link that appears below the title.
- To undo a delete, click on the Trash link above the list of Posts, find the post you’d like to restore and click the Restore link.
- Alternatively, you can delete a post by viewing the edit page for the specific post, and click Move to Trash in the top right, next to the Update button.
PEOPLE
People created in this section are used within the Bios Content Module. See the Content Modules section for additional details on how to display a bio.
Add a Person
- In the back-end of WordPress, hover over People in the left-hand column and click on Add New.
- Alternatively, you can click on People in the left-hand column, and then click the Add New button at the top of the page.
- Enter their name in the Title bar, then add Name, Position, and Bio below with the Featured Image in the right column
- Click Publish in the top right.
Edit an Existing Bio
- In the back-end of WordPress, click on Bios in the left-hand column, and then click the title of the Bio you’d like to update.
- Update the Title and any additional Content and click Update in the top right.
Delete an Existing Bio
- In the back-end of WordPress, click on Bios in the left-hand column, and then hover over the title of the Bio you’d like to delete.
- Click on the Trash link that appears below the title.
- To undo a delete, click on the Trash link above the list of Bios, find the event you’d like to restore and click the Restore link.
- Alternatively, you can delete an event by viewing the edit page for the specific event, and click Move to Trash in the top right, next to the Update button.
CONTENT BLOCKS
Content Blocks provide flexible content sections within each of your pages and posts. Content Blocks are explained below, but you can visit this Sample Page to get a better understanding of each content module. All content blocks can be added to the page navigation by filling in “Nav Title” in each content block.
To add a Content Block, click the “Add Content Block” button and select from the following:
- WYSIWYG – A basic text editor with formatting capabilities
- Text Area – this is a standard WYSIWYG editor
- Sidebar Block – to add a sidebar, click the Add Sidebar button
- Bios – select all of the bios in the left-hand relationship field that you’d like displayed on the page. Everything in the right-hand column will appear on the page. (Bio shape can be selected in the Customize options)
- Testimonial — testimonials are full-width blocks.
- Testimonial Quote – add the quote
- Name – add the name of the person to whom the quote is attributed
- Location – add the location/company of the person to whom the quote is attributed
- Detail – add another detail about the person to whom quote is attributed
- Person Image – add the photo of the person to whom the quote is attributed
- Background Image – add an background image. If not image is selected, a background is your solid primary color.
- Accordion — accordion (dropdown) content can be added by clicking the Add Accordion Block button. The first title and text block to fill out is for the content block and will appear next to the accordion. Then you can click “Add Accordion Block” to add multiple lines to the accordion content.
- Title — add a title for each accordion
- Text — add copy for each accordion
- Large Image – add a full-width image that will span the width of the page.
- Sponsors – Click “Add section” to create multiple divisions/levels of sponsors. Select title, secondary text, and size (three options) for each section independently. Then click “Add Sponsor” to add as many sponsors within each level – adding title, logo (optional), and link.
- Posts – This block features multiple cards of related posts. Choose either the most recent blog posts or pick a single category to show.
- Video — videos must be housed on a separate site such as Youtube or Vimeo. Copy the video link and paste it directly into the “Video Embed” field.
- The Transcript field allows you to paste a transcript and/or audio description of the video here for users with hearing and/or visual impairments. It is optional and will only show up if you input content here.
- Gallery – Publish a full grid of images with your introductory text. Images have to be uploaded individually and you can add a caption for each one.
- Productions – This content blocks creates cards for each of your productions that you choose. Select all of the productions in the left-hand relationship field that you’d like displayed on the page. Everything in the right-hand column will appear on the page. Cards will display three to a row.
- Calendar – Under “Calendar Type” select Month- or week-view. Select your starting date, if left blank this will automatically fill with the current date.
- Column Blocks – With “Column number” you can select to have from two up to five blocks in a row. For each block:
- Input your title
- Select icon or photo for “Graphic Type” depending on the type of image that you want to show. This will adjust the padding.
- If you would like a button on the block, input the text, select the type of link (external url, internal page, phone, email) and input the link.
- Instagram – This block previews the three most recent posts from your Instagram feed.
- In the “title” field, input the header for the section (i.e. Get to Know Us)
- For the “feed” field, input the url of your instagram profile and this is where the “Follow Us” button will link to.
- In order for this content module to work, you must also input the API token for your Instagram account under Options. See these detailed instructions below.
- Map – This block adds a map showing a location on your page. There are two fields to complete:
- Map Height —The options are small, medium and large. Medium is the default value. Width will not change; the map will always be as wide as the browser window.
- Location — This determines the marker location. Users can either click directly on the map to drop a marker, or you can type in the address or business and the marker will appear.
- ***NOTE: If an error that says “This page can’t load Google Maps correctly” pops up, that is okay. It should still load the markers properly.
- Downloadables – This block allows you to display any documents or files for users to easily access. You can click on the images to download the PDF immediately. When you upload a PDF, you can generate a thumbnail to show on the block or have the default image just be the download symbol.
- Input the Header
- Input your intro copy, unlimited length.
- Files fields
- Click ADD ROW for each new file you want to have available
- Click ADD FILE so select the specific file from your Media Library or Upload from your computer. You can add any file type.
- Type a FILE NAME that users will understand. It will display under the thumbnail.
- Add an image for the FILE THUMBNAIL if the file does not generate one automatically. (i.e. PDFs do not automatically generate a thumbnail when uploaded to WordPress) This allows you to control the preview that the users see.
Additional Sidebar Content Blocks for Pages
- Text Block – basic text block that will appear in the right hand sidebar
- Callout — the callout section allows you to highlight certain content. This is a block that appear in the right hand sidebar with an optional image and button.
- Text — you are limited to 120 characters for the copy.
- Add an Image
- Link Text — text for your call to action button
- Link Type — select whether the link will be an external url or internal page
- Input Link URL
- See the CALLOUT BOXES section below for more detailed instructions about universal vs. single page options
GOOGLE ANALYTICS
You can connect your Google Analytics account through the Options tab. In the back-end of WordPress, click on the Options tab in the left-hand sidebar. Just paste your Google Analytics tracking ID to ensure analytics are enabled. You can also connect your Google Tag Manager account here.
IMAGE SIZES
There are specific images that will be cropped to a certain dimension to fit the design. If the uploaded image does not at least meet the cropped dimensions below, it may look pixelated. NOTE: The crop will only occur if the image size is LARGER than the dimensions listed below.
- Hero (Homepage, Productions, and Pages) — 1440 x 800px
- Column Blocks — 720 x 400px
- Posts – 1440 x 800px
- Bio — 260 x 260px
- Testimonial (attribution photo) – 80 x 80px
- Testimonial (background photo) – 1440 x 800px
- Image Gallery — 720 x 400px
- Large Image – 1440 x 800px
FOOTER
Go to OPTIONS in the left-hand navigation on the backend.
CONTACT INFO
Offers fields for a variety of contact information that you may want to have readily available for users on your site.
- Mailing Title and Address – this is a header and content field for the first address set
- Location Title and Physical Address – this is a header and content field for a second address if needed
- Email and Phone – these are the main contacts for the organization and will live on the same bar at the social media icons
- Copyright – this is just the name of the organization or company, the year will update automatically
- Disclaimer – this field can be used for any disclaimer information or other additional content that you want to remain present in the footer.
SOCIAL MEDIA
- Click ADD SOCIAL LINK for each new icon you would like to include
- Select the SOCIAL PLATFORM from the dropdown list to assign the correct icon
- Copy and paste the link to your social media page in the URL field
- NOTE: To adjust the social media icon style, go to your CUSTOMIZER > ICONS to select the style for Social Icons.
CALLOUT BOXES
You are able to create callout boxes in the sidebar of your pages and posts. These callout boxes can either be universal or on a single page. Universal allows for callouts to be used on several different pages and add a default rotation of callouts on pages and posts. Single page callouts allow you to specify which callouts you want to appear on a single page.
Creating a New Universal Callout
- On the WordPress Admin, click CALLOUTS on the left hand navigation. Here you can add as many callouts as you would like.
- All the options are the same as listed above.
- If you would like to create a plain text box callout, simply leave the image and link options empty.
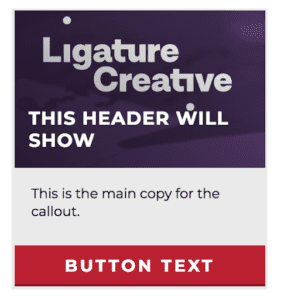
- Note: The Title does NOT show up in the callout. This is to help users keep callouts organized. The header WILL show in the CTAs.

Setting Pages and Posts Default Callouts
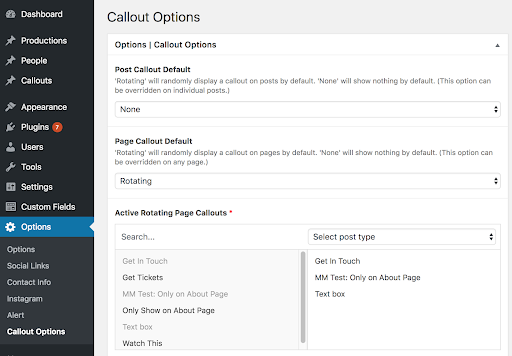
- In the WordPress Admin, click OPTIONS in the lefthand navigation and select CALLOUT OPTIONS.
- Here you can choose which callouts you would like to rotate on all pages and/or posts.
- If “None” is selected, by default, nothing will show up on posts or pages
- If “Rotating” is selected, by default one of the “Active Rotating Page Callouts” will appear on every page or post.
- You may select a single callout if you would like only that one to appear on ALL pages or posts.
Overriding the Default Callouts
You have the option to override the page/post default on any single post or page.
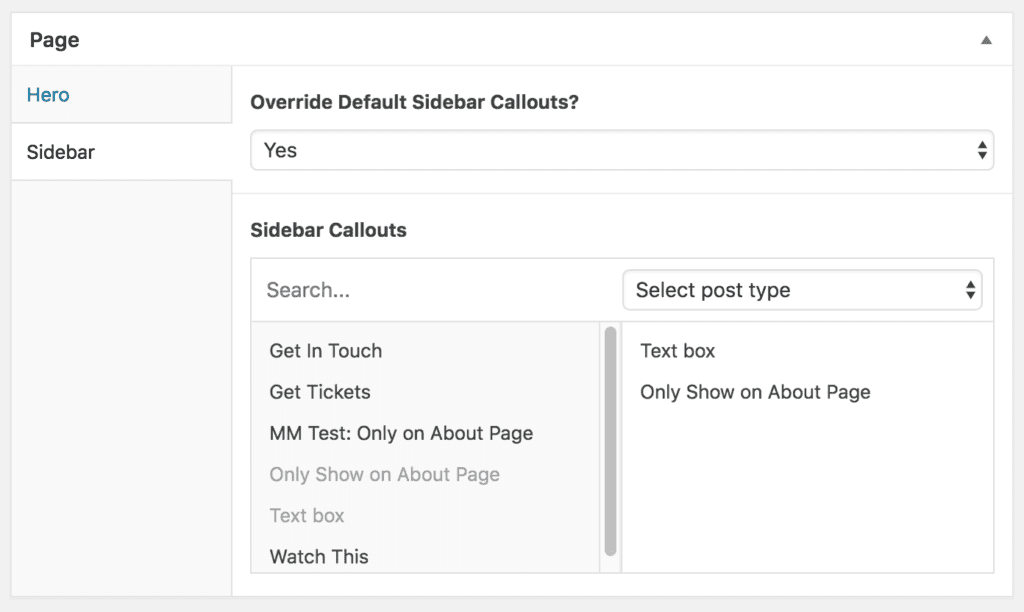
- Go to the page or post
- Under the new ‘Sidebar’ tab there is an option to override the default.
- Whichever callouts you choose here will show up on that given page or post.
- If you override, ALL callouts you choose will show up on the page. This differs from the default rotating callouts that show a single, random callout.
- The max number of callouts on a page or post is 3.
- If you wish to have zero callouts on a page and the default is currently set to rotating, you can choose “Yas” to override and simple do not select any override callouts.
INSTAGRAM FEED
This block previews the three most recent posts from your Instagram feed.

- In the “title” field, input the header for the section (i.e. Get to Know Us)
- For the “feed” field, input the url of your instagram profile and this is where the “Follow Us” button will link to.
Important: In order for this to work, you must go to INSTAGRAM FEED in the left-hand navigation on the backend in order to connect your Instagram account. Click CONNECT AN INSTAGRAM ACCOUNT and follow the steps to grant access to your account.
Instagram API Token
To get your API Token, follow these steps:
- Log into the Instagram account you wish to pull posts from
- Then go to https://outofthesandbox.com/pages/instagram-access-token
- Click ‘Generate Access Token’
- If you aren’t already logged into the account, it will prompt you to log into the account.
- Click ‘Authorize’ (Only will appear on the first time doing this)
- You will be redirected to a success page with the access token in bold.
- Copy and paste the token into the appropriate field.
EVENTBRITE EMBED
This feature allows the website to embed Eventbrite right onto a webpage so that users come complete the checkout process without leaving your site.
Here is an article that shows you how to pull the embed code from the Eventbrite event.
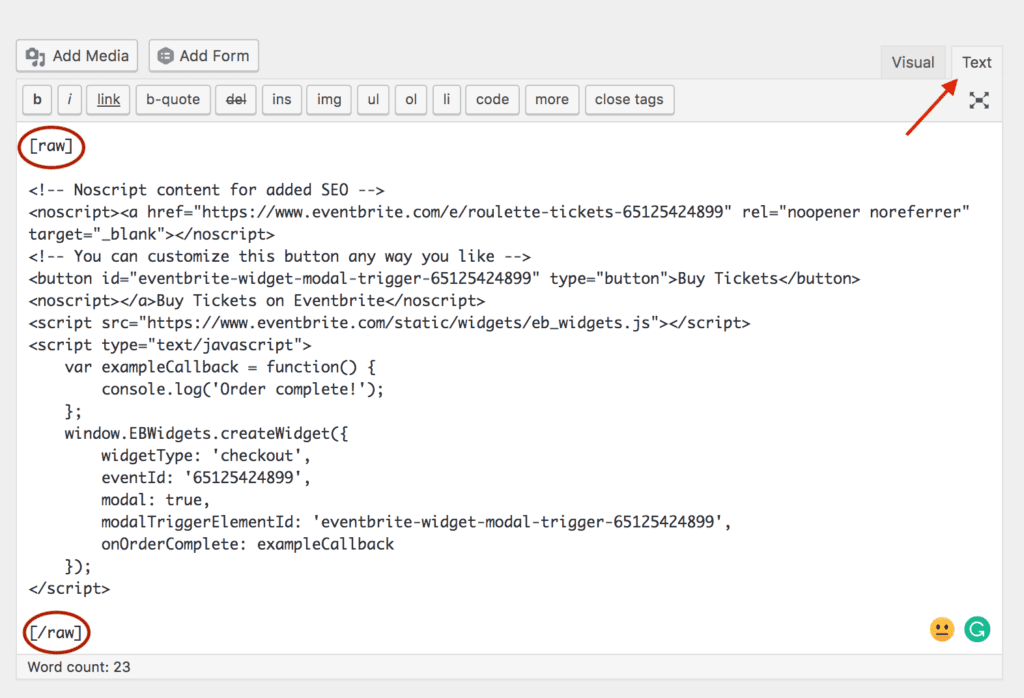
Manage Event > Website Integrations > Show Me > Embedded on a Page > Copy the Embed Code
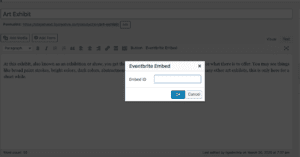
Below is a screenshot for where and how you will use the embed code to display the event. On any page, you can add this into the WYSIWYG/text editor through the “Text” tab. Copy in the embed code with the tag [raw] before and [/raw] after.
Eventbrite Pop Up Options
This feature allows to you to utilize a modal option for your Eventbrite ticketing. And it’s super easy to add to homepage hero buttons, column block buttons, CTA buttons, and through your text editors to appear right within your content.
- Select EVENTBRITE from the Button Type options
- If you’re adding to the Hero/Column Blocks/CTA button, select it from the dropdown
- If you’re adding it within a text editor, click EVENTBRITE BUTTON on the formatting toolbar
- Enter the Event ID from the your Eventbrite event
- ***You can pull this from the event’s url.
- Click OK